I have been lusting over lemlem‘s summer dresses for months now. They have been all over the blogosphere and even did a dress for JCrew (which has some amazing summer dresses right now!). However, I knew I wasn’t going to be able to foot the bill to get an authentic lemlem creation, so I made one of my own! It was rather simple really. The dress is pretty basic and I think that even a novice seamstress could fumble their way through to a beautiful summer dress. Here are the details!
{disclaimer – I am a fly by the seat of my pants, make my own pattern sewer. This is not a perfect method, it is just the way I made my dress}
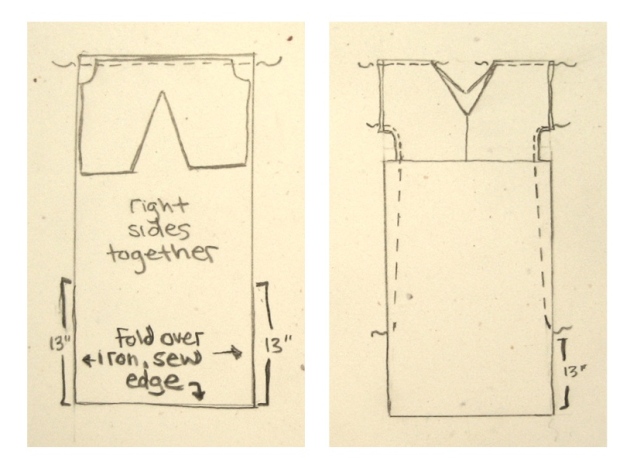
I started with this semi-sheer, hand dyed tapestry. I knew I would never use the tapestry it as-is and I always believe it is better to use something rather than just look at it, afraid to destroy it. Now I have a dress that I love, and wear all the time, and I think that is much better than just keeping the fabric on a shelf! But I digress… So the concept is simple, its basically a large rectangle with a triangle cut out for the neck and elastic to cinch the waist. Ive included the measurements for my dress on the diagram so keep in mind, I am 6′ tall, a bit curvy, around a size 8/10.
 Start by cutting two panels, 31″ x 48″ and then cut the two panels in half, at 19″ (now you have top and bottom). Remember, always cut and sew with right sides facing each other. Next, take the 2 pieces of the top half, fold in half, cut up the fold and cut out the rounded sleeve 10″ from the top (through all layers). You should now have 4 identical pieces.
 Now, its time to cut the neck, finish the edges on the neck and arm holes and bind the two front halves and back halves to each other. Separate the four pieces into two sets of two (right sides facing each other). Cut the neckline 9″ from the outside sleeve, and down to the depth desired (I did 10″ for the front and 8″ for the back). Next, fold, iron and sew the neck and arm hole edges and then sew each of the two halves together down the middle, under the neckline.
  Then, put one of the tops right side together centered on top of one of the bottom pieces and sew across the top. Repeat with the other top and bottom. Also, at this time fold over the bottom 13″ on the side of each bottom panel and sew the edge for the slits, and then finish the bottom edge as well. Now you are ready to put the entire dress together, right sides facing each other, sewing across the top, and the sides from the sleeves down to 13″ from the bottom.
Lastly, you need to put the elastic in the waist band. I measured out my elastic to the tightness I wanted, and then cut it into two equal pieces. For me, sewing the front and back elastic on separately was the easiest way. I sewed the elastic onto the inside of the waist seam, pulling the elastic long to the length of the side while sewing all the way to the end.
So there you go. Good luck!
Filed under: uncategorized


Comments (0)
Back to forge